

Turn a chip that costs a few dollars and a Bluetooth thermometer you may already own into a sensor that streams readings to a place you control. No soldering, no wiring, no app, and not a line of code. You flash it from this page, in your browser, and set it up by filling in a short form on the device itself. This is the first sketch in the library, and the shape the rest will take.
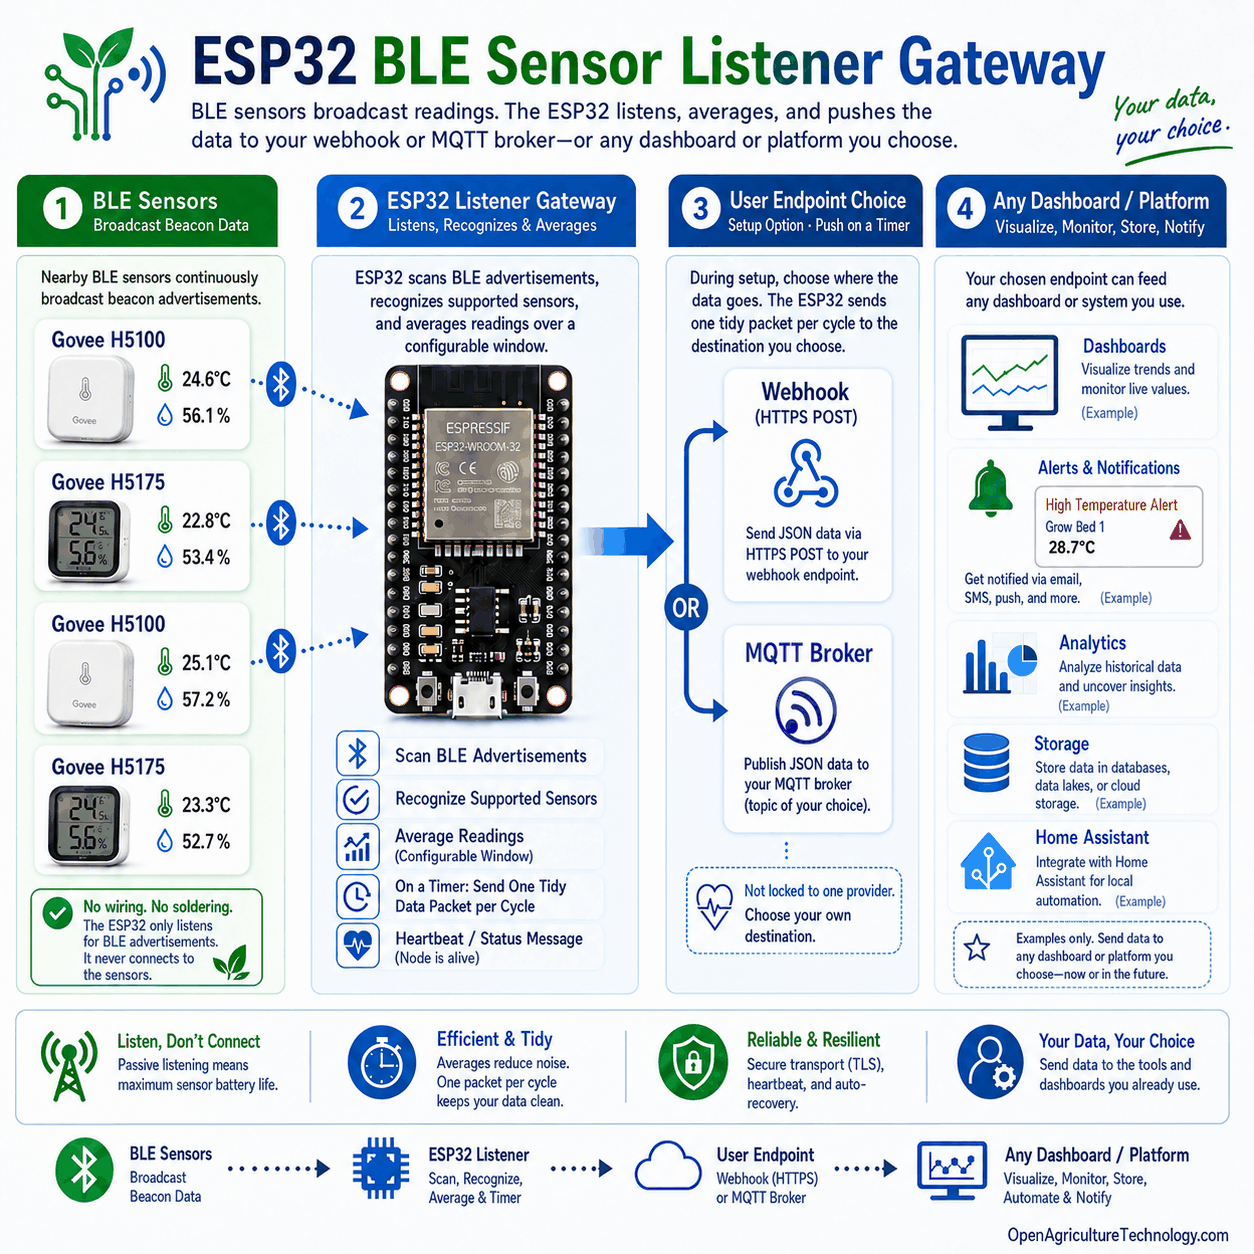
What it does.
Plenty of cheap Bluetooth sensors, Govee thermometers and well over a hundred other models (137 in the current Theengs Decoder list, the open decoder inside this firmware), already shout their readings into the air every few seconds. This node listens for them and harvests every measurement each one broadcasts, temperature and humidity, but also soil moisture, conductivity, CO₂, light, air quality, battery and signal, averages the chatty ones into steady numbers, and pushes them to an endpoint you own: your own webhook, an MQTT broker, or Open Agriculture Technology. Because it only listens, there is nothing to wire and nothing to solder, the sensor and the chip never touch.
By default it reports only the devices that broadcast a real sensor reading, so a room full of phones and stray Bluetooth gadgets stays quiet. Want just your sensors, or to include a beacon or a smart lock? Give it an allow-list of the addresses you care about during setup, and it reports those and nothing else.
That is the Collect layer made as small and cheap as it honestly gets. The value is in what you do with the reading later; the job here is just to get it flowing, reliably, to a place that is yours.
See it in action: the Open Agriculture Technology Test Endpoint is live right now, our own gateways pushing readings, and yours can join them in minutes.
Flash it.
Plug your board in, find it below, and press its button. Each button installs the image built for that exact board, and the installer checks the chip really matches before it writes anything, so you can't flash the wrong one.
If the board won't take the flash, or it restarts over and over
Hold the BOOT button down while you plug the USB cable in. Let go once it is plugged in, then press the install button above. That is the whole fix, and it is worth trying first any time a board is being stubborn.
Here is what is going on. A board with no working firmware on it restarts several times a second, forever, because it looks for a program to run and finds nothing. The installer needs the board to hold still long enough to write a megabyte and a half, and it cannot get hold of one that keeps restarting. Holding BOOT as the power arrives puts the chip into the loading mode it was built with, where no program runs at all, so there is nothing to restart and the installer gets a still target.
If you have a serial monitor open, you will know it worked because the scrolling stops. Quiet is what you want.
You may also see invalid header: 0xffffffff repeating in the monitor. That reads like damage and it is not: it is what an empty chip looks like, which is exactly where a board lands if a write was interrupted. The board is fine. Flash it again with BOOT held and it will come back.
If it flashes and runs fine on its own but fails the moment the sensor is connected, suspect whatever sits between them before you suspect either one. A screw-terminal carrier, an adapter board or a breakout is a component too, and a bridged or cracked terminal on one will stop the board booting while the sensor and the ESP32 are both perfectly good. Detaching the sensor is the quickest test: if the board comes back to life, neither it nor the sensor is at fault, and the thing in the middle is where to look. That exact fault cost us most of a night.
Two other things are worth checking before you decide a board is bad. Use a data USB cable, since a charge-only cable carries power but no signal and gives you the same symptoms. And plug straight into the computer rather than through a hub, because a write that browns out part way through leaves the board empty in just this way.
You'll need a data USB cable (not charge-only) and Chrome or Edge on a computer. Once it's flashed, set it up from any phone or laptop.
Prefer the source? Browse it on GitHub: the full project, openly licensed, ready to build yourself.
What you need.
About ten dollars of parts, most of which you may already have:
How it works.
Four steps, and only the middle one is the chip's job:
- Your sensor broadcasts its reading over Bluetooth, the way it already does.
- The node hears every nearby sensor it recognises and averages the readings over a window you set.
- On a timer, it pushes one tidy packet per cycle to your endpoint.
- Your dashboard, alert, or store reads it. Your data, your place.
It pushes wherever you point it, Open Agriculture Technology, your own Home Assistant, a broker you run, or a webhook you wrote this afternoon. The node keeps working even if Open Agriculture Technology disappears. That's the own-your-data rule in hardware.
Set it up.
All the setup happens on the device's own page, nothing to install, and it works with no internet, which is exactly what you want if you flashed a few at the extension office to take home.
- Power the node from any USB charger or your computer.
- On your phone or laptop, join the Wi-Fi network
OAT-Setup-XXXXXX(open, no password). A setup page opens by itself; if not, visithttp://192.168.4.1. - Sign in, fill in your device name, your Farm ID, the location, your Wi-Fi, and where the readings should go, then press Save & Connect. It joins your Wi-Fi right away and shows you its new address, no reboot, no hunting for it.
- Still on the setup page, look at Sensors heard. Every device the node has picked up is listed there with its model, signal and how long ago it was last heard, so you can tell whether it is hearing what you expected before you go any further. A sensor broadcasts every few seconds, so give it a minute. A device that goes quiet for ten minutes is marked silent and its stream released; it files straight back in when heard again.
- Open the node's Status page and press Push now. A green “OK” means a reading just reached your endpoint. Done.
What Farm ID is for. It names the operator rather than the node. A grower with ten nodes gives all ten the same Farm ID and each its own device name, so whatever receives the data can group a whole holding without guessing from node names. It rides every message.
The setup network stays on, so you can rejoin any time to change a setting, and your settings survive reboots. A fresh firmware flash wipes them clean, on purpose, so a re-used board never carries the last owner's Wi-Fi or endpoint.
On a native-USB board (C3 / C6 / S3) you can skip the Wi-Fi form and set it up over the browser console instead: connect, then type wifi, endpoint, and name. Handy if the setup network is being fussy.
Ready to test it? Enter https://iot-test.openagriculturetechnology.com/ingest as the
endpoint URL on the setup page, then open the
Open Agriculture Technology Test Endpoint
and pick your farm, the gateway name you gave the listener: your gateway and its sensors show up live,
readings, charts and heartbeat, no account needed. It keeps about an hour of readings, enough to prove
the chain works before you point the listener at an endpoint you keep. Prefer a message-by-message
check? The conformance sandbox shows each POST checked against
the standard.
Open the printable setup card (PDF)
A one-page field card with the steps and blanks to write each node's settings, print a stack before a workshop, or tuck one in with each board you hand out.
What it sends.
Two kinds of message, both tiny. Every cycle the node sends a batch of readings, one entry per measurement each sensor reports, in canonical units (°C, %RH, ppm, lx…) so the receiver never has to guess; every 60 seconds it sends a lean heartbeat reporting its own health, so your endpoint can tell “alive but quiet” from “dead.” Both carry a schema tag (oat-ods/0.3) so you can route and version them. Big batches are split into several small signed posts automatically, so a busy node never overruns a small chip:
See the two message types
A batch of readings, sent every cycle:
{
  "schema": "oat-ods/0.3",
  "msg_type": "batch",
  "sent_at": "2026-07-01T04:26:00Z",
  "seq": 2000006,
  "source": { "tier": "oat-ble-listener", "gateway_id": "gb-c6",
              "farm_id": "riverbend-farm",
              "fw": "OAT-BLE-Listener/2.1.0" },
  "messages": [
    { "observed_at": "2026-07-01T04:26:00Z",
      "stream": { "id": "A4:C1:38:9E:AB:CD", "name": "GVH5075_ABCD",
                  "location": "Greenhouse 2 / North bench" },
      "measurement": "temperature", "value": 23.41, "unit": "Cel",
      "agg": { "window_s": 60, "samples": 9, "method": "mean" },
      "source": { "physical_id": "A4:C1:38:9E:AB:CD",
                  "brand": "Govee", "model": "H5075", "rssi": -67 } },
    { "observed_at": "2026-07-01T04:26:00Z",
      "stream": { "id": "A4:C1:38:9E:AB:CD", "name": "GVH5075_ABCD" },
      "measurement": "humidity", "value": 58.7, "unit": "%RH",
      "agg": { "window_s": 60, "samples": 9, "method": "mean" } },
    { "observed_at": "2026-07-01T04:26:00Z",
      "stream": { "id": "AA:BB:CC:00:11:22", "name": "Flower care" },
      "measurement": "soil_moisture", "value": 34.0, "unit": "%",
      "agg": { "window_s": 60, "samples": 7, "method": "mean" },
      "source": { "physical_id": "AA:BB:CC:00:11:22",
                  "brand": "Xiaomi", "model": "HHCCJCY01", "rssi": -71 } }
  ]
}
A heartbeat, sent every 60 s, so the endpoint knows the node is alive even when a big batch can't get through:
{
  "schema": "oat-ods/0.3",
  "msg_type": "status",
  "observed_at": "2026-07-01T04:26:00Z",
  "state": "online",
  "source": { "tier": "oat-ble-listener", "gateway_id": "gb-c6",
              "farm_id": "riverbend-farm",
              "fw": "OAT-BLE-Listener/2.1.0" },
  "health": {
    "uptime_s": 315, "boot_count": 2, "reset": "poweron",
    "free_heap": 184200, "min_free_heap": 172400, "largest_block": 106496,
    "rssi": -74, "wifi_reconnects": 0, "push_ok": 5, "push_fail": 0,
    "transport": "https", "tls_ok": true, "chip": "ESP32-C6",
    "temp_c": 61.6, "loops_per_sec": 993,
    "lan_ip": "192.168.1.37", "ssid": "BarnWiFi", "mdns": "oat-gb-c6.local",
    "ble_seen": 886, "ble_decoded": 886, "ble_matched": 663
  }
}
Want the whole format, both message types, every field, and the full measurement vocabulary? See the developer reference, or read the machine-readable JSON Schema.
Supported boards.
The firmware needs both Wi-Fi and Bluetooth. We build a ready image for each board below; you pick yours on the flasher and the installer checks it matches before writing. The rule is support broad, recommend narrow.
Recommended, native USB
- ESP32-C3, the value pick, cheapest.
- ESP32-S3, more memory and pins to grow into.
- ESP32-C6, newest, Wi-Fi 6.
- All flash with no driver to install. Pick one with a USB-C socket.
Works, with a catch
- Classic ESP32, fine, but its USB chip (CP2102 / CH340) may need a one-time driver.
- ESP32-S2 / H2 / P4, not supported: missing Bluetooth, Wi-Fi, or a radio entirely.
New to these chips? The ESP32 family field guide explains the differences and which one to buy. A blessed buy-list with exact boards and links is being finalised.
For makers & trainers.
Frequently asked questions.
Do you need to know how to code to flash an ESP32?
No. Browser-based installers flash a prebuilt firmware image to an ESP32 with one button, over a USB cable, using Chrome or Edge. Setup afterward is filling in a short form served by the device itself, or typing a couple of commands into a serial console. There is no code to read or edit unless you want to change how the firmware behaves.
How much does a DIY Bluetooth sensor gateway cost?
A few dollars for the ESP32 board that does the work. The sensor it listens to is a consumer Bluetooth thermometer many people already own, such as a Govee, which runs about $10 to $20 new. The firmware is free and open source, so a complete node, bought entirely new, typically totals $25 to $50 including the sensor.
Can you flash an ESP32 from a web browser?
Yes, on a computer running Chrome or Edge. Browser flashing uses Web Serial, a feature that lets the browser talk to the board over USB, and Safari, Firefox, and phone or tablet browsers do not support it. The initial flash therefore needs a desktop or laptop, but once the firmware is on the board, configuration works from any phone or computer on the network.
Where does the data from a DIY sensor node go?
Only to the endpoint configured on the device. A node running open firmware pushes each reading to whatever destination you enter during setup: your own webhook, your own MQTT broker, a hub such as Home Assistant, or a cloud service you choose. Nothing is transmitted anywhere else, and the destination can be changed later in the device's settings.
Can you sell devices flashed with open-source firmware?
Yes, in general. Open-source firmware licenses allow flashing boards and selling or giving away the result, provided the license terms are followed. This is a common pattern in grower and maker communities: one technically comfortable person flashes a batch of inexpensive ESP32 boards, and others nearby buy or receive a ready-to-configure node without touching the flashing step. Check the specific license, since some require sharing any modifications.